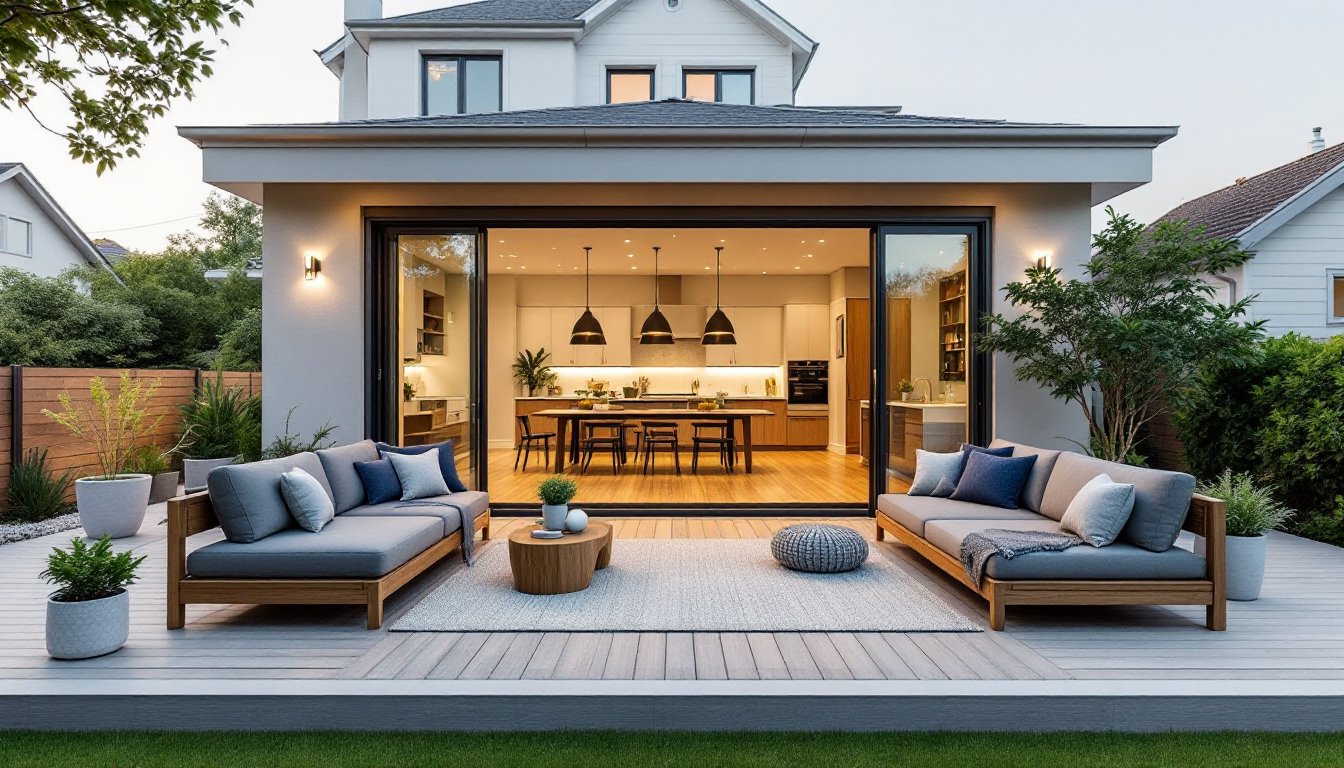
An indoor-outdoor kitchen breaks down the barrier between your home and backyard, letting you cook, entertain, and live fluidly across both spaces. Whether you’re grilling steaks while guests gather on a covered patio or prepping ingredients indoors and finishing them outside, this setup transforms how families use their homes. The trend has moved beyond luxury estates, today’s homeowners are integrating dual kitchens as a practical investment in lifestyle and property value. If you’re ready to expand your entertaining footprint, understanding layout, appliances, electrical needs, and design cohesion is essential. Let’s walk through how to plan and build an indoor-outdoor kitchen that works year-round.
Table of Contents
ToggleKey Takeaways
- An indoor-outdoor kitchen breaks down barriers between your home and backyard, enabling seamless entertaining and daily use across both spaces while adding measurable property value.
- Successful layout design requires positioning the outdoor kitchen within 5 to 15 feet of your indoor kitchen with clear sightlines, adequate outdoor space (150–200 square feet minimum), and a covered structure to extend usability year-round.
- Essential appliances for an indoor-outdoor kitchen include a quality built-in grill, side burner, mini refrigerator, and sink, all in marine-grade or commercial outdoor-rated materials that withstand weather exposure.
- Electrical and plumbing infrastructure demands permits and professional installation: GFCI-protected outlets for safety, underground or insulated water lines below the frost line, and proper drainage compliance with local building codes.
- Design cohesion across your indoor-outdoor kitchen—matching colors, materials, flooring, and lighting—creates visual continuity that makes the dual spaces feel intentionally planned rather than disconnected additions.
Why Indoor-Outdoor Kitchens Are Transforming Home Entertainment
Entertaining has changed. Guests no longer cluster in the living room while one person cooks in isolation. An indoor-outdoor kitchen puts you at the center of the action, you’re flipping burgers while someone refills drinks inside, and the whole gathering flows as one event rather than separate zones.
From a practical standpoint, this setup adds flexibility. Bad weather? Move prepped food and cooking indoors. Overflow crowd? Use both kitchens simultaneously. You’re not confined to a single prep station, and that breathing room makes hosting less stressful. A properly designed dual-kitchen setup also adds real estate value: buyers recognize the functional appeal immediately.
Consider the daily use case too. Morning coffee on the patio, lunch prep in your main kitchen, dinner grilled outside, you’re using both spaces throughout the day, not just for parties. This constant utility justifies the investment and makes the project feel less like a luxury add-on and more like a sensible home expansion.
Planning Your Layout: Space and Flow Considerations
Before you order a single appliance, sketch your footprint. A successful indoor-outdoor kitchen requires a clear sightline and easy movement between zones. Most homeowners place the outdoor kitchen within 5 to 15 feet of the main indoor kitchen, close enough to share utilities and flow naturally, far enough to define separate spaces.
Think about how doors and pathways work. A sliding glass door or French door opening directly onto a covered patio is ideal: it creates the seamless transition that makes the whole concept feel integrated rather than jury-rigged. If your back door opens onto an uncovered deck, you’ll want to build or extend a covered structure (patio, pergola, or roof) above the outdoor cooking area. Bare sun or rain exposure makes the outdoor kitchen less usable.
Measure your outdoor space carefully. The outdoor zone should have at least 150 to 200 square feet for a functional kitchen layout, enough room for a grill, counter space, seating, and traffic flow without feeling cramped. Cramped outdoor kitchens get used less because they feel inefficient.
Seamless Transitions Between Indoor and Outdoor Zones
The key to a cohesive indoor-outdoor kitchen is minimizing friction between the two. Ideally, your outdoor cooking island or counter sits roughly level with your indoor countertops (typically 36 inches high). If there’s a step or ramp between zones, make it a gentle slope or single step, nothing that forces you to navigate a staircase while carrying food or drinks.
Material choices matter here too. If your indoor kitchen has wood cabinetry, consider outdoor-rated wood or a color-matched alternative on your outdoor island. If your indoor counters are granite or quartz, match the aesthetic with outdoor-rated stone or concrete. The visual continuity makes the spaces feel planned rather than patched together. You’re looking at Modern Covered Outdoor Living solutions that share your home’s design language.
Essential Appliances and Equipment for Dual Kitchens
The outdoor kitchen needs a different appliance lineup than your indoor range. A gas or charcoal grill is the centerpiece, most homeowners pick a mid-range built-in unit (around 36 to 42 inches wide). Built-in grills integrate flush into outdoor cabinetry and look more finished than cart-style grills. Don’t cheap out here: a quality grill lasts 10-15 years with basic maintenance, while budget units rust and fail in half that time.
Add a side burner or outdoor cooktop for sauces and sides that don’t belong on the main grill. A mini refrigerator keeps drinks and perishables close by, so you’re not running inside constantly. Stainless steel or marine-grade finishes handle weather better than standard materials. A sink, yes, actually, transforms your outdoor kitchen from a grilling station into a full prep area. You’ll need hot and cold water lines run out (see the electrical and plumbing section below), but the convenience pays dividends.
Storage cabinets designed for outdoor use keep tools, serving dishes, and seasonings protected from elements. Standard indoor cabinets will warp, rot, or rust outdoors. Look for stainless steel, powder-coated aluminum, or marine-grade polymer cabinetry. Countertop material should be weather-resistant: outdoor-rated concrete, stainless steel, or stone designed for exposure. Skip butcher block and standard particleboard.
Weather-Resistant Materials and Outdoor-Grade Appliances
Weather resistance isn’t a luxury in outdoor kitchens, it’s survival. Everything exposed to the elements will degrade unless specifically rated for exterior use. When shopping for appliances, confirm they’re marine-grade or commercial outdoor-rated. This means stainless steel construction (particularly 304 or 316-grade), sealed electrical components, and finishes that handle UV exposure and humidity without significant fading.
A covered structure overhead, a roof, pergola, or awning, extends the usable season dramatically. Even a simple pergola with retractable shade provides protection from intense sun and light rain, making the space functional in marginal weather. Full roofing (attached or free-standing) lets you cook during moderate rain and shields appliances from direct water exposure.
Paints and stains used outdoors should be exterior-grade with UV protection. Interior paint or stain will peel and fail within a season. If you’re finishing outdoor cabinetry, use polyurethane or marine-grade varnish, not interior lacquer. Small details like stainless steel fasteners (not standard steel) prevent rust stains and discoloration. You can find design inspiration and practical product recommendations at The Kitchn for outdoor kitchen solutions.
Electrical and Plumbing Requirements for Your Setup
This is where you need to get serious about building codes and permits. An outdoor kitchen with appliances and a sink requires both electrical and plumbing infrastructure. Do not cut corners here, improper work creates fire and electrical hazards, and unpermitted work can affect insurance or home sale.
For electrical, you’ll need a dedicated circuit (typically 20 or 30 amps, depending on appliances) run from your home’s breaker panel to a GFCI-protected outlet (Ground Fault Circuit Interrupter) rated for wet locations. Outdoor outlets must be weatherproof, and all wiring should run through underground conduit or above-grade conduit rated for exterior use. The National Electrical Code (NEC) requires GFCI protection for all wet locations, and most jurisdictions require a licensed electrician for this work. Hire one, this isn’t a DIY shortcut.
For plumbing, you’ll need hot and cold water lines run to your outdoor sink and any appliances requiring water (some outdoor refrigerators have ice makers). Water lines should be buried below the frost line in your region (typically 12 to 48 inches deep, depending on climate) or wrapped with heat tape and insulation if above-grade. A shutoff valve on the outdoor side lets you drain lines before winter in cold climates, frozen water lines crack and leak. Return drainage (from the sink) routes to a gravel-bed French drain or ties back to your home’s main sewer, depending on local codes. Check with your local building department first, plumbing permits are mandatory, and inspectors will verify proper slope, materials, and drainage.
Many jurisdictions require a building permit for outdoor kitchens, especially if they’re covered or permanent structures. Permits cost money and add time, but they protect you. Unpermitted work can be ordered removed, affect your home’s insurance claim if something goes wrong, or tank the sale if an inspector catches it. Spend the $100-300 on a permit now rather than $5,000 in problems later.
Design Tips for Cohesive Indoor-Outdoor Aesthetics
A disjointed aesthetic kills the whole concept. If your indoor kitchen is sleek and modern but your outdoor kitchen looks rustic and weathered, the spaces feel like they belong to different homes. Consistency doesn’t mean identical, it means a shared design language.
Start with color. If your indoor kitchen features whites, grays, and stainless steel, lean outdoor cabinetry toward the same palette. If you’re working with warmer tones (beige, taupe, cedar), carry those outdoors. Hardware, backsplash, and accent colors should echo what works indoors. This creates visual continuity without feeling formulaic.
Flooring transitions are powerful. If possible, use the same material (or a very similar one) on the indoor side of your threshold and extending out onto the patio, large-format pavers, polished concrete, or porcelain tile that mimics stone work beautifully. A hard floor also makes the outdoor kitchen feel intentional, not like an afterthought bolted onto the deck.
Lighting ties everything together. String lights, recessed soffit lights, or pendant fixtures above the outdoor counter create ambiance while making the space functional at night. These fixtures should feel like they belong with your home’s existing outdoor aesthetic. If you have modern landscape lighting indoors, choose similar fixtures outside. Your outdoor kitchen needs 15 to 20 foot-candles of task lighting over the grill and prep area, enough to cook safely after sunset, but not so bright it looks like a stadium.
Texture and materials matter too. Rough stone or stained wood paired with stainless steel and concrete creates visual interest. Avoid too many competing materials: three main materials (stone, metal, wood or composite) is a good rule. If you’re building a Custom Outdoor Living setup, ensure the cabinetry and countertops complement your home’s exterior finishes, siding, trim, and existing hardscape. Real-world examples at Homify Indoor-Outdoor Kitchens show how cohesive design elevates the entire outdoor space. You can also explore House Plans with Outdoor Living to see how architects integrate these spaces from the design phase.
<h2 id="” data-id=””>Conclusion
An indoor-outdoor kitchen is one of the smartest home improvements you can make for your lifestyle and property value. The key is planning honestly from the start: measure your space, understand your utilities, confirm permit requirements, and design with intention. Don’t skimp on weather-resistant materials or electrical work, those investments pay dividends in longevity and safety. With solid planning and realistic expectations, you’ll build a space that works as hard as you do, whether you’re hosting a crowd or enjoying a quiet dinner for two.