A Big Green Egg outdoor kitchen isn’t just a grill station, it’s a statement investment that transforms how you cook, entertain, and spend time outside. Whether you’re a weekend chef or a serious backyard enthusiast, building a Big Green Egg outdoor kitchen adds both functionality and real property value. This guide walks you through the essentials: why this iconic ceramic cooker deserves to be your centerpiece, what complementary stations and infrastructure you’ll need, how to lay out your space for workflow and safety, and how to keep everything running smoothly year-round. If you’re ready to stop grilling in isolation and start hosting memorable outdoor meals, let’s dig in.
Table of Contents
ToggleKey Takeaways
- A Big Green Egg outdoor kitchen serves as a versatile centerpiece that eliminates the need for multiple grills, maintaining consistent temperatures from 225°F smoking to 700°F searing while delivering 30–50% fuel efficiency gains over standard grills.
- Proper foundation, location, and layout are critical—build on a level concrete pad at least 4 inches deep, maintain 12 feet of clearance from combustible materials overhead, and position the egg away from natural foot traffic to ensure safety and workflow efficiency.
- Complementary stations like stainless steel prep tables, refrigerated storage, and organized cabinetry are workflow necessities, not optional upgrades, when designing your Big Green Egg outdoor kitchen.
- Regular seasonal maintenance, including gasket seal inspection, weatherproof covers, and cleaning with a brass brush after each cook, ensures your ceramic cooker remains durable and efficient year-round.
- Organize your outdoor kitchen using a work triangle layout (heat source, prep surface, and storage) to mirror standard kitchen design and reduce wasted steps during entertaining.
Why the Big Green Egg is the Ultimate Centerpiece for Your Outdoor Kitchen
The Big Green Egg has earned its reputation for good reason. Unlike traditional charcoal or gas grills, this ceramic cooker maintains temperature with stunning consistency, whether you’re searing at 700°F or smoking low and slow at 225°F. That versatility means you’re not buying three separate grills: you’re buying one powerful tool.
The egg’s insulation is its secret weapon. The thick ceramic shell and grates regulate airflow like nothing else on the market, burning less fuel while delivering restaurant-quality results. Home cooks report fuel efficiency gains of 30–50% compared to standard grills, which matters when you’re cooking multiple times a week.
Design-wise, the Big Green Egg looks intentional in any outdoor space. It commands attention without screaming “expensive toy.” That aesthetic appeal, combined with its durability across decades, makes it the natural focal point of a thoughtful backyard layout. It invites people over. It makes you want to cook.
Essential Elements of a Big Green Egg Outdoor Kitchen Setup
Choosing the Right Location and Foundation
Location is non-negotiable. You need level, stable ground, ideally a concrete pad or permeable pavers, not bare soil. Soil shifts seasonally, settling unevenly under the egg’s weight. A small concrete slab (minimum 4 inches deep, finished to a 3000 PSI specification) or composite deck boards rated for outdoor use work well. Make sure the foundation extends at least 18 inches beyond the egg’s diameter on all sides for safety clearance and future workspace.
Checking for wind exposure matters more than most DIYers realize. A sheltered corner beats an exposed patio, strong winds rob heat, cool your food faster, and make temperature control harder. Avoid placing the egg directly under eaves, though: you need at least 12 feet of clearance overhead from any combustible material, including overhanging branches. Some jurisdictions have specific setbacks from property lines (often 5–10 feet for cooking equipment), so check your local building code before finalizing placement.
Electricity and water aren’t immediate needs, but planning for them during the foundation phase is smart. Running conduit or a shallow trench for a garden hose before pavers go down saves a major headache later.
Complementary Cooking and Prep Stations
The egg sits at the heart, but it shouldn’t work alone. A stainless steel side table (30–36 inches wide) gives you space for prepping proteins, plating, and setting down tools safely away from heat. This isn’t an aesthetic choice, it’s a workflow necessity. Materials matter: stainless steel resists staining and warping far better than wood or powder-coated metal in outdoor conditions.
Add a refrigerated drawer or mini cooler within arm’s reach for ingredient storage and keeping proteins at safe temperatures before cooking. A simple food prep counter or movable island (roughly 24 inches deep, 48 inches long) provides enough room for chopping, seasoning, and assembling dishes. Many outdoor kitchens include a sheltered storage cabinet nearby for spices, utensils, and fuel, keep extra charcoal, ceramic replacements, and cleaning tools organized and dry.
Consider a modular outdoor kitchen system if you want to avoid building custom cabinetry. These prefab units stack and connect, letting you scale up over time without major construction. Recent modern outdoor kitchen designs show how thoughtful material selection and clever layout can make even small spaces feel intentional and functional.
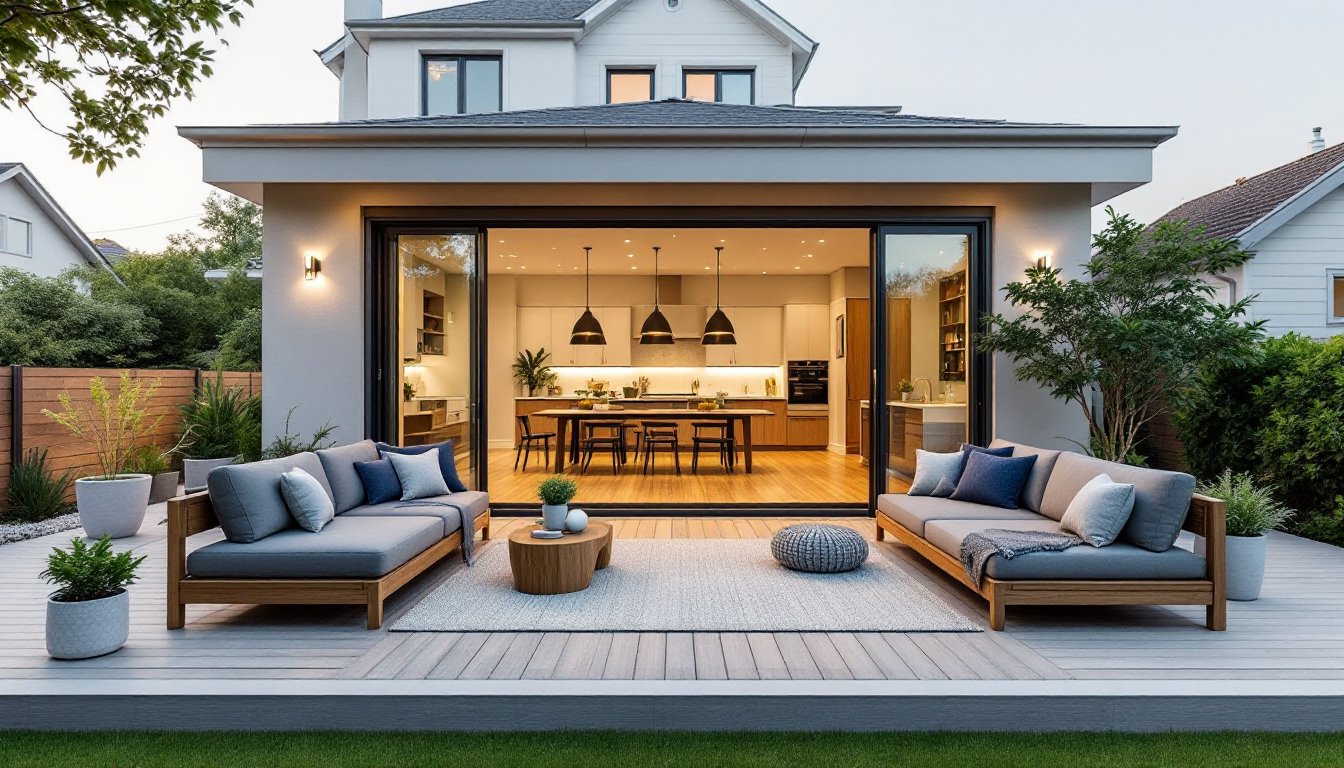
Design and Layout Inspiration for Your Space
Your outdoor kitchen’s layout hinges on traffic flow and safety. The golden rule: never place the egg where guests or kids naturally walk past. Tuck it into a corner or against a fence, leaving a 5–6 foot diameter of open space around it for the person cooking to move freely. That buffer also keeps spectators and pets at a safe distance from intense heat and flare-ups.
If you’re building a larger setup, organize stations in a work triangle: the egg (heat source), prep surface, and storage/serving area. This mirrors standard kitchen design and cuts down on wasted steps. Group dining furniture outside this triangle so people can sit and watch the cooking without getting underfoot.
Material continuity matters visually and functionally. Coordinate your side tables, counters, and cabinetry in complementary finishes, stainless steel pairs well with composite decking or natural stone countertops. A simple pergola or shade structure overhead (positioned so it doesn’t trap heat near the egg) ties the zone together and makes the space usable during hot afternoons. Regional outdoor living styles vary: Southern Living’s outdoor spaces showcase how design adapts to climate and aesthetic preference, which might spark ideas for your own setup.
Step-by-Step Installation and Setup Tips
Foundation and Placement
-
Prepare your concrete pad or paver base. If pouring concrete, ensure proper drainage slope (roughly 1/8 inch per foot) to prevent pooling water. Let concrete cure for at least 7 days before placing weight on it.
-
Position the egg dead center on your foundation. Use a level to confirm the unit sits true, even a slight tilt affects temperature distribution during longer cooks. Shim as needed with plastic shims or sand.
Assembling the Dome and Grates
-
Unpack and inspect all ceramic components for cracks or chips before assembly. Missing or damaged pieces now mean delays later.
-
Install the dome onto the base, following the manufacturer’s instructions precisely. The fit should be snug: the gasket material (typically provided) creates the seal that holds temperature.
-
Mount grates and thermometer. The top grate and any lower cooking surfaces slide into metal supports. The temperature gauge goes into a drilled opening near the dome’s peak, this is your window into consistent results.
Adding Accessory Hardware
-
Install the metal cart stand or table base that stabilizes the egg during cooking. This isn’t optional: it distributes weight and prevents dangerous tipping.
-
Attach side tables, shelving, and any built-in accessories. Secure everything to your concrete or deck structure, not floating. Use stainless steel fasteners outdoors to prevent rust staining.
First Fire and Seasoning
-
Run a low, slow burn for 2–3 hours before serious cooking. This lets refractory materials fully cure and allows any manufacturing residue to burn off harmlessly. Do this on a windless day and keep children and pets indoors.
-
Do a full temperature test. Bring the egg up to 225°F, hold it for 30 minutes, then push to 400°F and hold again. This confirms your dome seal is airtight and thermometer readings are stable.
Maintenance and Seasonal Care for Year-Round Enjoyment
The beauty of a ceramic cooker is durability, with basic care, your Big Green Egg will outlast most grills on the market. After each cook, let it cool completely, then brush the grates and interior surfaces with a brass brush to remove ash and food debris. A damp cloth wipe-down of the exterior ceramic keeps it looking fresh: avoid harsh chemicals that can dull the finish.
Seasonal shifts demand attention. Cold weather doesn’t damage the egg, but rapid temperature swings can stress the ceramic. In winter, cover the unit with a fitted weatherproof cover (made for Big Green Eggs specifically, generic covers trap moisture and cause problems). Before extended breaks, ensure the interior is clean and dry inside the dome to prevent mold growth.
Spring startup involves checking the felt gasket seal around the dome joint. If it’s compressed or damaged, replace it, a bad seal kills fuel efficiency and temperature control instantly. The gasket kit is inexpensive compared to struggling through summer cooks. Inspect your metal components (handles, thermometer hardware, cart base) for rust or corrosion: a light wire brush and a coat of food-safe metal oil refreshes everything.
Perfect outdoor cooking spaces evolve: home improvement resources offer seasonal prep checklists and deep-cleaning guides that apply to any outdoor kitchen setup. Store your ceramic replacements and fuel indoors during the off-season. If you’re not cooking for weeks, leave the egg closed but unlit, this keeps interior moisture and pests out far better than leaving it wide open.
One final tip: keep a log of your best cooks. Note the fuel load, ambient temperature, and results. Over time, you’ll dial in your egg’s personality and know exactly how to hit target temperatures in any season. That knowledge is what separates novice BGE owners from the ones who cook magic every weekend.