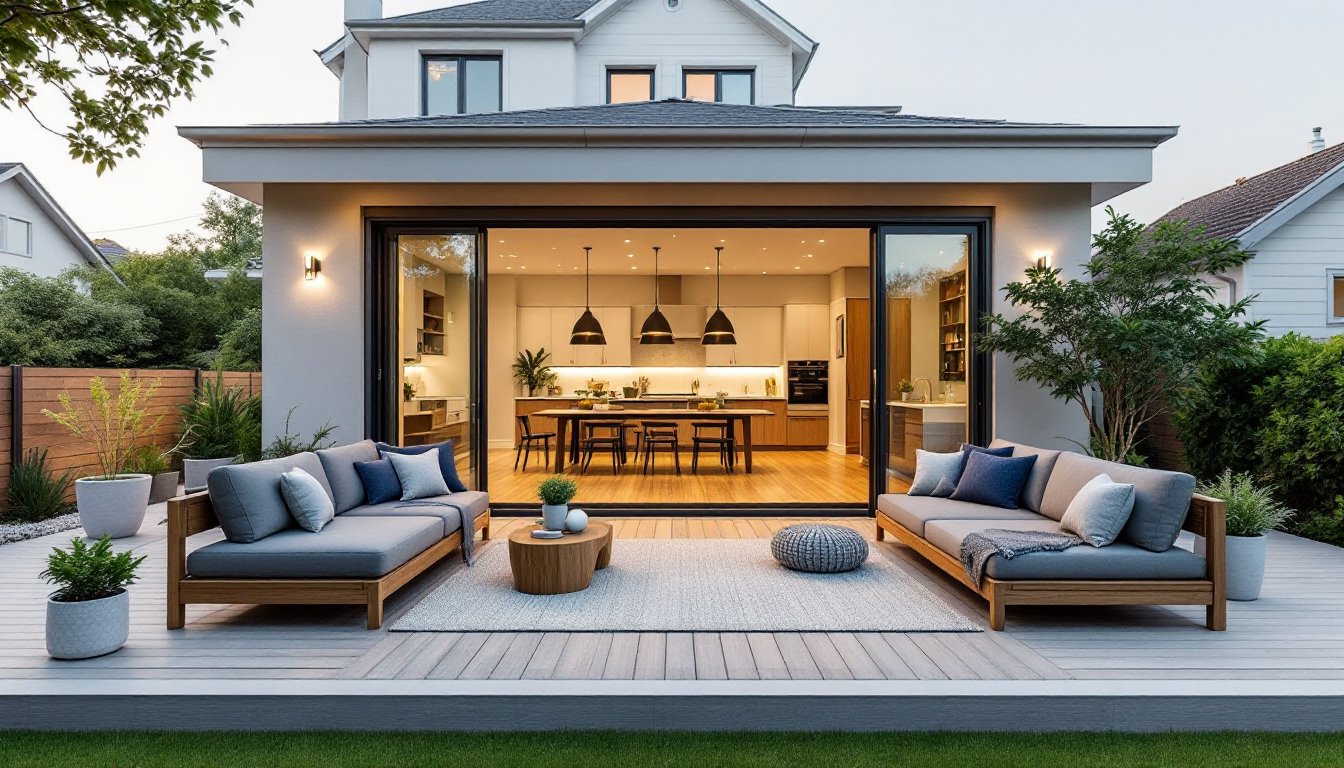
An outdoor kitchen with a roof transforms your backyard from a fair-weather hangout into a year-round entertaining space. Whether you’re flipping burgers in summer or hosting holiday gatherings under shelter, a covered outdoor kitchen combines functionality with protection from the elements. The right roof design lets you cook, dine, and gather comfortably without worrying about rain or intense sun. This guide walks through the why, the how, and the material choices that make an outdoor kitchen with a roof a practical, and rewarding, DIY investment.
Table of Contents
ToggleKey Takeaways
- An outdoor kitchen with a roof protects appliances and extends your entertaining season year-round by shielding against rain, UV exposure, and temperature swings that damage equipment and finishes.
- Polycarbonate panels offer a budget-friendly, DIY-friendly roofing solution ($100–$300 per 4-by-8-foot sheet) with natural light transmission, though they require replacement every 10–15 years due to UV degradation.
- Metal roofing (standing seam aluminum or steel) provides superior durability with 30+ year lifespans and excellent water shedding, but requires proper slope, precision installation, and higher upfront costs ($800–$2,500 for 12-by-16-foot structures).
- Proper design must include structural permits, footings below the frost line, adequate ventilation to escape smoke and heat, and a minimum 2:12 roof slope to prevent water pooling and rot.
- Hiring a structural engineer for a few hours ($300–$500) can save thousands by preventing roof failure, making it a practical investment alongside professional installation of gas lines and electrical circuits.
Why Add a Roof to Your Outdoor Kitchen
A roof over your outdoor kitchen serves far more than aesthetic appeal. It extends your cooking and entertaining season by protecting appliances, countertops, and your guests from rain, hail, and excessive UV exposure. Without overhead protection, wooden framing rots, stainless steel fades and corrodes, and expensive grills deteriorate faster than expected.
Weather protection also means consistency. You won’t have to break down your space or cancel dinners when clouds roll in. Gas lines, electrical circuits, and countertop finishes all last longer under cover. Plus, a roof creates shade during scorching afternoons, making the space more comfortable for cooking and lingering.
From a property standpoint, a well-designed covered outdoor kitchen adds resale value and square footage appeal. Buyers see a finished, weather-protected entertaining space rather than exposed equipment. It’s an investment that pays dividends in both daily use and home value.
Roofing Material Options for Your Outdoor Kitchen
Your roof material choice shapes durability, maintenance demands, cost, and aesthetics. Each has trade-offs worth understanding before committing to a build.
Polycarbonate and Acrylic Panels
Polycarbonate is a clear or tinted plastic that transmits light while filtering UV rays. It’s lightweight, easy to cut, and requires minimal framing, often just aluminum or steel beams. Acrylic panels offer similar benefits but with different impact resistance and clarity options.
Polycarbonate is DIY-friendly because you can install it yourself using standard fasteners and basic tools. A 4-by-8-foot sheet runs roughly $100–$300 depending on thickness and clarity. The real appeal is cost-effectiveness and the natural light it provides, so your cooking area doesn’t feel like a cave.
The downside? Polycarbonate degrades under constant UV exposure over 10–15 years and can yellow or cloud. It also expands and contracts with temperature swings, so proper installation with sliding fasteners (not rigid bolts) is critical. Maintenance is simple, occasional washing, but expect eventual replacement.
Metal and Aluminum Structures
Metal roofing (standing seam steel or aluminum) offers durability and a sleek look. Aluminum is rust-resistant and lighter than steel, making it ideal for DIY installation on modest-sized structures. A standing seam aluminum roof system typically costs $800–$2,500 for a 12-by-16-foot kitchen, depending on finishes and local labor.
Metal roofs shed water effectively and handle heavy loads, snow, fallen branches, and foot traffic. They don’t degrade in UV light and can last 30+ years with minimal maintenance. The trade-off is cost upfront and the need for proper slope (typically 3:12 or steeper) for water drainage.
Installing a metal roof requires precision, seams must be sealed correctly to prevent leaks. If you’re comfortable with a miter saw and following fastener spacing standards, aluminum is manageable. Steel is heavier and often calls for professional help, especially on larger spans. Consider modern covered outdoor living spaces for inspiration on blending aesthetic roofing with function.
Hybrid approaches also work. Many DIYers combine polycarbonate panels on one section with metal on another, balancing cost, light transmission, and longevity based on use.
Essential Design Considerations
Building an outdoor kitchen with a roof isn’t just about slapping materials overhead. Proper design ensures safety, functionality, and compliance with local codes.
Structural Load and Permits
Your roof must support its own weight plus rain, snow, and debris. Check your local IRC (International Residential Code) and town zoning requirements, most jurisdictions require a permit for any roofed structure over a certain size or attached to your home. A structural engineer can size beams and footings if you’re building over 200 square feet or in snow-heavy regions. Don’t skip this step: a collapsed roof isn’t a DIY learning moment.
Footings must go below the frost line (typically 3–4 feet in northern climates) to prevent heaving. Posts should be set in concrete, not sitting on soil. If your outdoor kitchen is freestanding, aim for posts spaced 10–12 feet apart for aluminum structures, closer for lighter polycarbonate.
Ventilation and Heat Management
Grills produce smoke and heat. A roof traps both unless you plan for airflow. Leave gaps at the roof edges or install vents to allow smoke to escape, otherwise, you’ll cook in a sauna and invite wood rot. Some builders use a sloped roof with open gables or install a motorized roof vent. Think of it like your kitchen range hood: you need exhaust pathways.
Utilities and Safety
If you’re running gas lines or electrical circuits under the roof, hire licensed professionals for those connections. Gas leaks and electrical faults aren’t DIY territory. Run electrical in properly-rated conduit and keep wiring at least 10 feet from the grill to meet NEC standards. Ground all metal structures to prevent electrical hazards during storms.
Roof Slope and Drainage
A flat roof collects water, ice, and debris. Aim for at least a 2:12 slope (2 inches of rise per 12 inches of run) to ensure water sheds properly. In heavy snow regions, a steeper pitch (4:12 or more) reduces load buildup. Poor drainage leads to pooling, rot, and structural failure over time.
These considerations aren’t roadblocks, they’re the foundation of a long-lasting structure. Many homeowners find that hiring a structural engineer for a few hours ($300–$500) is cheaper than rebuilding a failed roof. For broader context, patio covered outdoor living spaces show how thoughtful design extends usable seasons. Resources like ImproveNet offer cost guides and contractor resources to help estimate labor if you decide to outsource installation.
Materials and Tool Checklist
For a polycarbonate roof on a 12-by-16-foot structure, gather: aluminum or steel beams, polycarbonate sheets, sliding fasteners, flashing, a miter saw, a drill, level, tape measure, and safety glasses. For metal roofing, add a crimping tool and seaming equipment. Budget 2–3 weekends for a DIY polycarbonate build: metal roofing usually demands more precision and often benefits from professional installation.
Working with Contractors
If the scope feels beyond your skill level, hiring professionals for the frame and roof, while handling finishing work yourself, is a smart compromise. Outdoor living spaces contractors can handle structural work while you tackle countertops, tile, or landscaping. Similarly, custom outdoor living spaces showcase designs you might adapt for your budget and skill set. Sites like Southern Living explore outdoor entertaining designs that blend inspiration with practical planning.
Conclusion
An outdoor kitchen with a roof is a genuine asset, it protects your investment, extends seasons, and creates a dedicated entertaining zone. Start with your climate and budget: polycarbonate works well in mild regions and for budget builds, while metal delivers longevity if you can handle the upfront cost. Plan for permits, ventilation, and proper drainage from the beginning. Whether you’re tackling the whole project yourself or partnering with contractors, the result is a backyard space you’ll use and enjoy year-round.