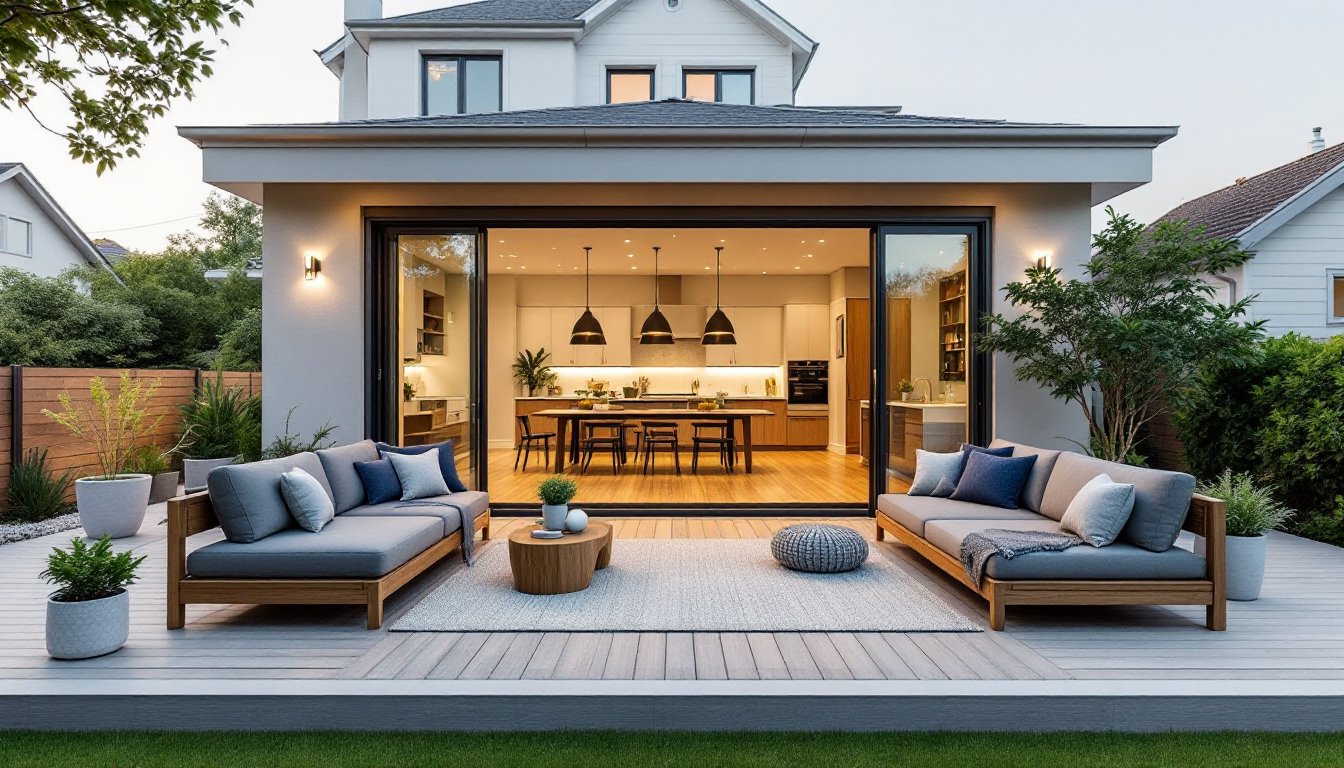
A Green Egg outdoor kitchen transforms your backyard into a year-round entertainment hub, combining the versatility of a ceramic grill with dedicated prep and serving spaces. Whether you’re a weekend pitmaster or a casual host, investing in a structured setup elevates both the functionality and appeal of your outdoor living area. This guide walks you through planning, building, and outfitting a Green Egg kitchen that suits your space, skill level, and budget, no contractor speak, just practical steps to create a grilling station you’ll actually use.
Table of Contents
ToggleKey Takeaways
- A Green Egg outdoor kitchen transforms your backyard into a functional entertainment hub that encourages 2–3 times weekly use compared to a standalone grill, while boosting home resale appeal.
- Essential components include a properly mounted Egg on a ceramic cart or masonry surround, 2–3 linear feet of counter space, weatherproof storage, and a shade structure for year-round usability.
- A minimal Green Egg kitchen costs $2,000–$4,000, mid-range setups run $6,000–$10,000, and premium installations exceed $15,000—start with essentials and upgrade incrementally after living with the setup for a season.
- Position your Green Egg outdoor kitchen at least 10 feet from structures, perpendicular to prevailing winds, with 3 feet of clear space in front for safe operation and proper smoke ventilation.
- Prioritize a level concrete foundation, check for underground utilities before digging, and hire licensed professionals for gas lines or electrical work to ensure code compliance and safety.
Why a Green Egg Outdoor Kitchen Is Worth the Investment
A ceramic grill like the Green Egg holds heat exceptionally well and handles everything from slow smoking to high-temperature searing. Unlike traditional gas grills, it operates independently of fuel lines, meaning you can place it anywhere on your property. The durability is real, these grills are built to last decades with minimal maintenance.
When you add counter space, storage, and prep areas around the Egg, you’re not just parking a grill in the yard: you’re creating a functional outdoor kitchen that encourages more entertaining and cooking. Guests can gather while you work, and you won’t waste time running in and out of the house for tools or ingredients. Many homeowners report using their outdoor kitchen 2–3 times per week once it’s properly set up, far more frequently than a standalone grill.
There’s also the practical angle: outdoor cooking keeps heat and smoke out of your indoor kitchen during warm months, and a well-designed setup increases your home’s resale appeal. Homes with quality outdoor living spaces, especially those featuring 12 outdoor kitchen ideas for effortless alfresco dining, command stronger buyer interest.
Essential Components for Your Green Egg Outdoor Kitchen Setup
A functional Green Egg kitchen needs more than just the grill itself. Start with a solid list of what you’ll actually use daily versus what can wait for phase two. Resist the urge to buy everything at once, your first iteration will teach you what you’re missing.
The Egg Grill and Mounting System
The Big Green Egg itself (available in sizes from Small to XL) is the centerpiece. Most homeowners go with the Medium or Large for residential use: the Medium fits most standard outdoor kitchen footprints, while the Large handles bigger crowds and more ambitious smoking projects.
Never set your Egg directly on wood decking or a bare patio. Use a ceramic grill cart or a custom-built mounting frame. Factory-made carts from the Egg manufacturer include integrated thermometers, side shelves, and sturdy wheels: they run $300–$600 depending on size. If you’re building a permanent kitchen, anchor the Egg in a masonry surround or a reinforced metal stand bolted to concrete, this is non-negotiable for safety and stability.
Include a grill cover (around $50–$100) to protect against weather and extend the life of your Egg’s exterior paint and hardware.
Counter Space and Work Surfaces
You need at least 2–3 linear feet of counter space minimum. This accommodates a prep zone (cutting, seasoning, plating) and a serve zone (resting meats, holding sides). For permanent installations, concrete countertops or tiled surfaces are durable and affordable: expect $40–$80 per linear foot installed. Stainless steel tops look professional and resist staining but cost $80–$150 per linear foot.
If you’re building from scratch, aim for a 36-inch counter height to match kitchen standards. Use 4×4-inch pavers or poured concrete footings to level and support the structure. Store frequently used items, tongs, spatulas, wood chips, thermometers, in a weatherproof cabinet or drawer built into the frame beneath the counters.
Include a prep table or side shelf next to the Egg for staging meats, vegetables, and sauces before they hit the grill. This keeps your main counter clutter-free and speeds up cooking.
Design Layout and Space Planning
Site your Green Egg kitchen where it’s visible from your main patio or living area, this encourages gathering and makes entertaining smoother. Ensure it’s at least 10 feet away from structures (house, fence, pergola) to allow for smoke clearance and prevent fire risk. Check local fire codes: many jurisdictions require this distance, and some demand a permit for permanent installations.
Position the grill perpendicular to prevailing winds if possible. This keeps smoke from blowing across your seating area and helps with ventilation around the cooking zone. If you’re on a slope, build your platform level using concrete pads or compacted gravel as a base, an uneven grill will throw off your cooking and looks unfinished.
Plan your workflow: position your prep table or counter to the grill’s left (if you’re right-handed), with storage and a serving area to the right or directly behind. This mimics how professional outdoor chefs arrange their stations. Leave at least 3 feet of clear space in front of the Egg for opening doors and moving around safely. According to resources like Southern Living, well-designed outdoor kitchens balance aesthetic appeal with genuine functionality, your layout should support both.
Consider adding a shade structure, a pergola, umbrella, or lean-to roof, over the cooking and prep zones. This protects you from sun and light rain, making the kitchen usable more often throughout the year.
Budget Breakdown and Cost Considerations
A minimal, functional Green Egg setup (grill, basic cart, counter, and storage) runs $2,000–$4,000. A mid-range installation with concrete counters, a weather-resistant cabinet, and landscaping can hit $6,000–$10,000. Premium builds featuring stone veneers, built-in sinks, and hardscaping can exceed $15,000.
Break down your budget like this:
- Egg and cart: $1,200–$1,800
- Countertops and frame: $1,500–$4,000 (depends on material and size)
- Storage and cabinetry: $500–$1,500
- Shelves, lighting, accessories: $300–$800
- Hardscaping and pad prep: $500–$2,000 (optional but recommended)
Start with essentials and upgrade incrementally. A concrete pad, a sturdy cart, and basic stainless counters will serve you well. Add a built-in sink, tile surround, or decorative elements once you’ve lived with the setup for a season and know what you actually need.
Costs vary significantly by region and material availability. Stone and concrete prices fluctuate, and labor rates differ between areas. Get multiple quotes before committing to contractors, and always confirm that any structural or electrical work complies with local building codes.
Installation Tips and Best Practices
Before you dig or pour anything, check for underground utilities. Call 811 or your local utility locating service at least three days before any excavation, this takes five minutes and prevents catastrophe.
Foundation and leveling are critical. Pour a 4-inch concrete pad at least 3 feet × 3 feet, and use a laser level to confirm it’s truly flat. An unlevel grill throws off temperature readings and creates hot and cold spots. If you’re using pavers, set them in a 2-inch sand base and tamp firmly with a hand tamper or plate compactor.
When assembling the Egg or installing a custom frame, wear work gloves and safety glasses. Ceramic is brittle: if you’re moving a large Egg or handling its dome, get a second pair of hands, these things weigh 400+ pounds depending on size.
For countertop installation, ensure supports are level before setting stone or tile. Use a cement backer board as underlayment, not plywood (it will rot). Apply thin-set mortar rated for outdoor use and let it cure for 48 hours before grouting.
If you’re running a gas line or electrical outlet nearby, hire a licensed professional. This isn’t a DIY task if you want insurance coverage and code compliance. Grills sometimes feature thermometer probes and electric rotisseries, these need proper weatherproofed wiring.
After installation, let your Egg or counters settle for a few days before heavy use. Season a new Egg with a mild fire before serious cooking. Inspect seals and fasteners monthly during the first year: ceramic and wood-adjacent materials shift slightly with temperature swings. Finally, use landscape design inspiration from resources like Gardenista to integrate your kitchen visually with existing plantings and hardscape, a thoughtfully sited setup feels intentional rather than tacked-on.