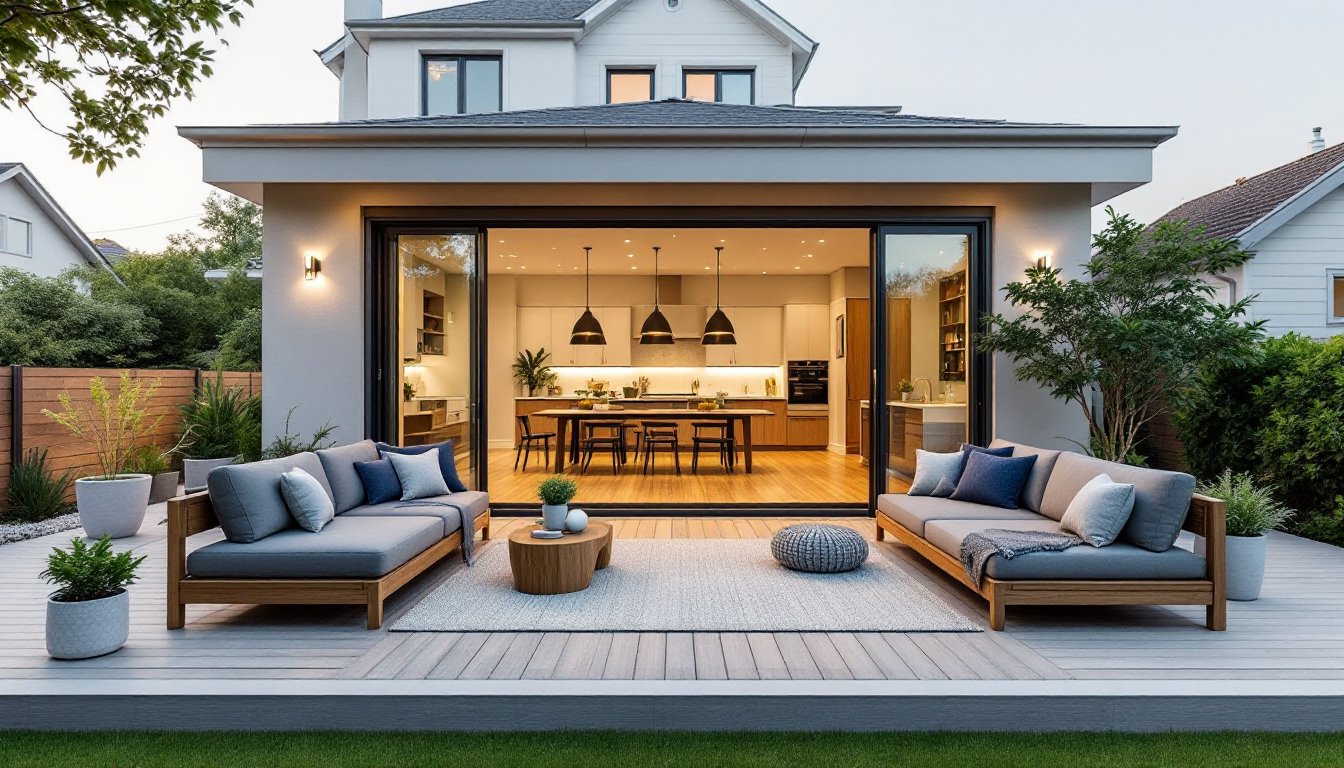
An outdoor kitchen and BBQ space transforms your backyard into an extension of your home, a place where cooking meets entertaining. Whether you’re grilling steaks for family or hosting neighbors on a Saturday evening, an outdoor kitchen bbq setup adds real value and functionality to your property. Unlike a standalone grill tossed on a patio, a planned outdoor kitchen brings together counter space, storage, weather protection, and thought-out workflow. This guide walks you through the essentials: what you actually need, how to lay it out smartly, and where to cut costs without cutting corners.
Table of Contents
ToggleKey Takeaways
- An outdoor kitchen bbq setup recovers 50–70% of its cost at resale while keeping heat and smoke away from your main living spaces.
- Choose your grill type based on use: gas for quick heating and control, charcoal for authentic flavor, or pellet grills for a balance of both.
- Plan for at least 3–4 linear feet of counter space, weatherproof storage, and a work triangle layout (grill, prep area, serving zone) spaced 3–5 feet apart for smooth workflow.
- Invest in durable, non-combustible surfaces like stainless steel, composite decking, or sealed concrete near your grill to withstand heat and moisture.
- Start with a modest $400–$800 grill and basic counter setup, then expand incrementally with shade, electricity, and appliances once you confirm your entertaining habits.
- Always hire a licensed professional for gas lines, plumbing, and electrical circuits; DIY utility work creates safety and code compliance risks.
Why Invest In An Outdoor Kitchen
A dedicated outdoor kitchen isn’t just a luxury, it’s a smart home investment. Homeowners use outdoor spaces year-round, and a well-designed bbq area increases both your enjoyment and property value. You’ll actually spend time outside instead of running back and forth to the indoor kitchen for condiments, plates, and ice.
From a practical standpoint, an outdoor kitchen keeps heat and smoke away from your living spaces during summer months. Cooking outdoors means no air-conditioning running overtime, and cleanup happens away from your main kitchen. You’re also more likely to entertain when everything you need is outside, fewer excuses to skip that cookout.
Real estate data shows that custom outdoor living spaces can recover 50–70% of their cost at resale, depending on market and build quality. A thoughtfully designed setup signals to buyers that your property has been maintained and upgraded. Even a modest outdoor kitchen with a quality grill, counter space, and storage outperforms a bare patio when it comes time to list.
Essential Components of An Outdoor Kitchen BBQ Setup
Grill Selection and Placement
Your grill is the centerpiece, and choosing the right one matters. Gas grills (powered by propane or natural gas lines) heat quickly, offer precise temperature control, and require minimal fiddling. Charcoal grills deliver authentic smoky flavor and cost less upfront, but demand more attention and cleanup. Pellet grills split the difference, offering both flavor and convenience at a higher price point.
Size depends on your household and entertaining habits. A 27-inch grill handles a family of four: 36-inch models work for regular entertaining: anything larger is overkill for most homes. Place your grill at least 10 feet from your house (check local fire codes, they vary by jurisdiction) and position it away from overhanging branches and roof lines. Ensure it sits on a level, non-combustible surface like concrete or pavers, not wood decking.
Built-in grills require gas or electrical lines run before the structure is framed. If you’re not confident running utility lines, hire a licensed professional, fumbling with gas connections isn’t a DIY moment. Portable grills offer flexibility and require no permanent installation, making them ideal if you’re renting or testing the concept first.
Counter Space and Storage Solutions
Counter space is where outdoor kitchens fail most. A single cutting board’s worth of space creates frustration fast. Aim for at least 3–4 linear feet of prep and plating area. Stainless steel or sealed concrete work well: wood decking or standard lumber doesn’t hold up outdoors. Marine-grade plywood, composite materials, and stone (granite, bluestone, or engineered quartz) are durable choices that age gracefully.
Storage keeps your grill clean and your backyard organized. Weatherproof cabinets (marine-grade plywood with exterior finish, or metal frames) store grilling tools, charcoal, propane backup tanks, and entertaining supplies. Avoid standard indoor cabinets, they rot. A mini-fridge or cooler near the grill saves trips indoors and keeps drinks, butter, and fresh herbs at hand.
Incorporate a sink if budget and utility lines allow. Even a small prep sink with hot and cold water cuts indoor kitchen trips by 40%. If plumbing isn’t feasible, a portable station with a hose connection keeps things functional without running permanent lines.
Layout and Design Considerations
Layout determines workflow. Position your grill so you’re not facing the sun (glare kills accuracy and enjoyment). The “work triangle”, grill, prep counter, and serving area, should allow you to move smoothly without backtracking. Most comfortable spacing places these elements 3–5 feet apart.
Consider prevailing wind direction. Smoke should drift away from seating areas and your neighbor’s porch. If wind typically blows north in your yard, angle the grill opening south and position dining upwind.
Roof or shade matters more than many assume. A pergola or retractable awning lets you cook during light rain and keeps you comfortable during peak sun. Permanent structures like solid-roof pavilions require building permits and footings dug below the frost line (typically 2–3 feet, varying by region). Consult local code or an inspector before pouring concrete pads.
Decking or surface material affects both safety and longevity. Composite decking near the grill performs better than wood (heat-resistant and rot-proof). Pavers or concrete withstand temperature swings and grease splatter without staining. Leave an 18-inch clearance around your grill for heat dissipation and safe access.
Electricity simplifies life, string lights, a small refrigerator, or a sound system require outdoor-rated circuits. Run conduit underground or along posts, and hire a licensed electrician to install circuits rated for outdoor use (typically GFCI outlets per NEC code). DIY wiring in wet environments invites shock hazards and code violations.
Budget-Friendly Tips for Building Your Outdoor Kitchen
Start modest. A quality $400–$800 gas grill, a $200–$400 built-in counter section (DIY-installed stainless steel or sealed wood), and basic tools get you functional and tested. Add storage, shade, and luxuries later once you know your habits.
Build incrementally. Lay pavers or pour a concrete pad yourself (rent a concrete mixer for ~$50/day and follow mixing ratios on the bag). A simple frame with marine-grade plywood and outdoor sealant creates basic counter space without hiring a contractor. Stain or paint it once yearly to extend life.
Source materials wisely. Salvaged or slightly-damaged stainless steel counters (from restaurant supply outlets or Facebook Marketplace) cost 30–50% less than new. Reclaimed wood, sealed with marine epoxy, adds character and frugality. Composite decking scraps or discount pavers from big-box stores reduce surface costs without sacrificing durability.
Handle the grill yourself if it’s a standalone unit. Most gas grills assemble in under an hour with basic hand tools. Built-in installations, utility runs, and structural work, hire help. Outdoor living spaces contractors can handle complex builds: get three quotes and compare scope, timeline, and warranty.
Skip the high-end finishes early. A simple painted storage cabinet works as well as powder-coated aluminum at a quarter the cost. Upgrade appliances and materials once the core structure proves its worth and your budget recovers. Many DIYers overbuild initially and never use half the features, don’t be that person.
Conclusion
An outdoor kitchen bbq space doesn’t require a six-figure renovation. Start with a solid grill, weatherproof counter space, and basic storage, then expand over time. Prioritize layout and safety (clearances, codes, and utility runs) over fancy finishes. Build incrementally, test your habits, and upgrade where it matters. A well-planned outdoor kitchen transforms your backyard into a functional, inviting space you’ll actually use, and that’s where the real value lives.